Unlocking Unrivaled Tenderness: The Magic of 24 Hour Sous Vide Ribs
Imagine biting into a rib so tender, the meat practically melts in your mouth, effortlessly separating from the bone with just a gentle tug. This isn't a culinary fantasy, but a delectable reality achievable through the revolutionary method of 24 hour sous vide ribs. While debates rage among barbecue enthusiasts about the "best" way to cook ribs—be it smoking, grilling, or baking—there's a growing consensus that sous vide, particularly with a 24-hour cook time, elevates pork ribs to an entirely new dimension of flavor and texture.
For many, including seasoned home cooks, these aren't just ribs; they're an experience, a guaranteed crowd-pleaser that elicits raves every single time. Forget the guesswork of traditional methods that can result in dry, chewy, or inconsistent results. The sous vide technique offers unparalleled precision, ensuring your ribs are cooked to absolute perfection, every single time. So, if you're ready to transform your rib game and impress even the most discerning palates, prepare to embark on a journey that culminates in the ultimate fall-off-the-bone tenderness.
Why 24 Hour Sous Vide Ribs Reign Supreme for Tenderness and Flavor
The concept of cooking ribs for a full 24 hours might sound daunting, but it's precisely this extended, low-temperature bath that unlocks their incredible potential. Unlike conventional cooking methods where maintaining an exact internal temperature can be a constant battle, sous vide—meaning "under vacuum"—uses a precisely controlled water bath to cook food evenly from edge to edge. Here's why the 24-hour duration for 24 hour sous vide ribs is a game-changer:
- Unmatched Tenderness: The prolonged exposure to a consistent, moderate temperature (typically around 145-155°F or 63-68°C) allows the tough connective tissues in the ribs to slowly break down into gelatin. This process is crucial for achieving that signature fall-off-the-bone texture without turning the meat mushy or dry. A shorter cook time simply won't yield the same level of enzymatic breakdown and collagen conversion.
- Perfect Medium Doneness, Every Time: With sous vide, it's virtually impossible to overcook or undercook your ribs. The water bath ensures the ribs reach and maintain your desired internal temperature, eliminating the risk of dry edges or raw spots often encountered with ovens or grills. You get perfectly cooked meat throughout.
- Enhanced Moisture Retention: Sealing the ribs in an airtight bag before cooking locks in all their natural juices and the flavors from your rub. This results in incredibly moist and succulent ribs that simply can't be replicated by dry-heat cooking methods alone.
- Flavor Infusion: The vacuum-sealed environment allows the spice rub to deeply penetrate the meat over the extended cooking period, infusing every bite with rich, savory, and sweet notes that are far more pronounced than with a quick marinade.
This method isn't just about cooking; it's about transforming the meat at a molecular level, delivering a consistently superior product that will make you rethink everything you thought you knew about ribs.
The Essential Steps to Perfect Your Sous Vide Ribs
Achieving those legendary 24 hour sous vide ribs requires a few critical steps, from initial preparation to the final flourish. Each stage plays a vital role in developing the incredible texture and robust flavor profile.
Prepping Your Ribs for Perfection
The journey to phenomenal ribs begins long before they meet the water bath. Proper preparation is key:
- Choosing Your Ribs: While this method works wonders for both baby back ribs and spare ribs, baby backs are often preferred for their leaner profile and quick cooking time (relative to other methods). Spare ribs, including St. Louis cut, offer more meat and fat, resulting in a richer flavor, but may require a slightly longer finishing time.
- Removing the Membrane: This is a non-negotiable step. On the concave (bony) side of the ribs, you'll find a thin, white membrane. Use a knife or the handle of a spoon to lift one edge of this membrane, then grip it with a paper towel and peel it off. This ensures a more tender bite, prevents the ribs from curling, and allows your rub to better penetrate the meat. Pro Tip: Don't hesitate to ask your butcher to remove the membrane for you when you purchase the ribs – it saves time and effort!
Crafting Your Signature Dry Rub
The dry rub is the backbone of your flavor profile, and for mastering 24 hour sous vide ribs, it's essential. While personal preference is paramount, a good rib rub typically strikes a balance between savory, sweet, and a touch of heat or smokiness. Ingredients like paprika (especially smoked paprika), garlic powder, onion powder, brown sugar, salt, black pepper, and chili powder are common.
- The Power of Salt and Sugar: The salt in your rub acts as a tenderizer and flavor enhancer, while sugar contributes to tenderization and helps create that beautiful caramelization during the finishing stage.
- Application Technique: Don't be shy! Generously coat the entire rack of ribs, front and back, with your dry rub. Massage it in thoroughly with your hands, ensuring every crevice is seasoned. This deep massage helps the rub adhere and work its magic during the extended sous vide process.
- Strategic Seasoning: For an extra burst of flavor and a fantastic crust, save about 1/4 cup of your dry rub. You'll use this just before the final grilling or broiling stage, adding another layer of aromatic goodness.
The Sous Vide Water Bath Immersion
Once your ribs are prepped and seasoned, it's time for their long, relaxing bath:
- Sealing the Ribs: Place the seasoned ribs into a vacuum-sealable bag. If you don't have a vacuum sealer, you can use the water displacement method with a high-quality freezer bag. Submerge the bag in water, allowing the water pressure to push the air out, then seal it just above the waterline. Ensure there's no air trapped, as this can affect heat transfer.
- Temperature and Time: Set your sous vide circulator to your desired temperature. For fall-off-the-bone ribs, a range of 145-155°F (63-68°C) for 24 hours is generally recommended. Lower temperatures (e.g., 135°F/57°C) for a longer period (36-48 hours) will yield a more steak-like texture, while higher temperatures (e.g., 165°F/74°C) for a shorter time (8-12 hours) will result in a firmer, but still tender, rib. For the ultimate fall-off-the-bone experience, stick with the 24-hour cook.
- Ensuring Submersion: Make sure the bagged ribs are fully submerged in the water bath. You can use heavy-duty clips or weights to keep them down if they float. Cover the water bath with foil or a lid to prevent excessive evaporation over the 24-hour period.
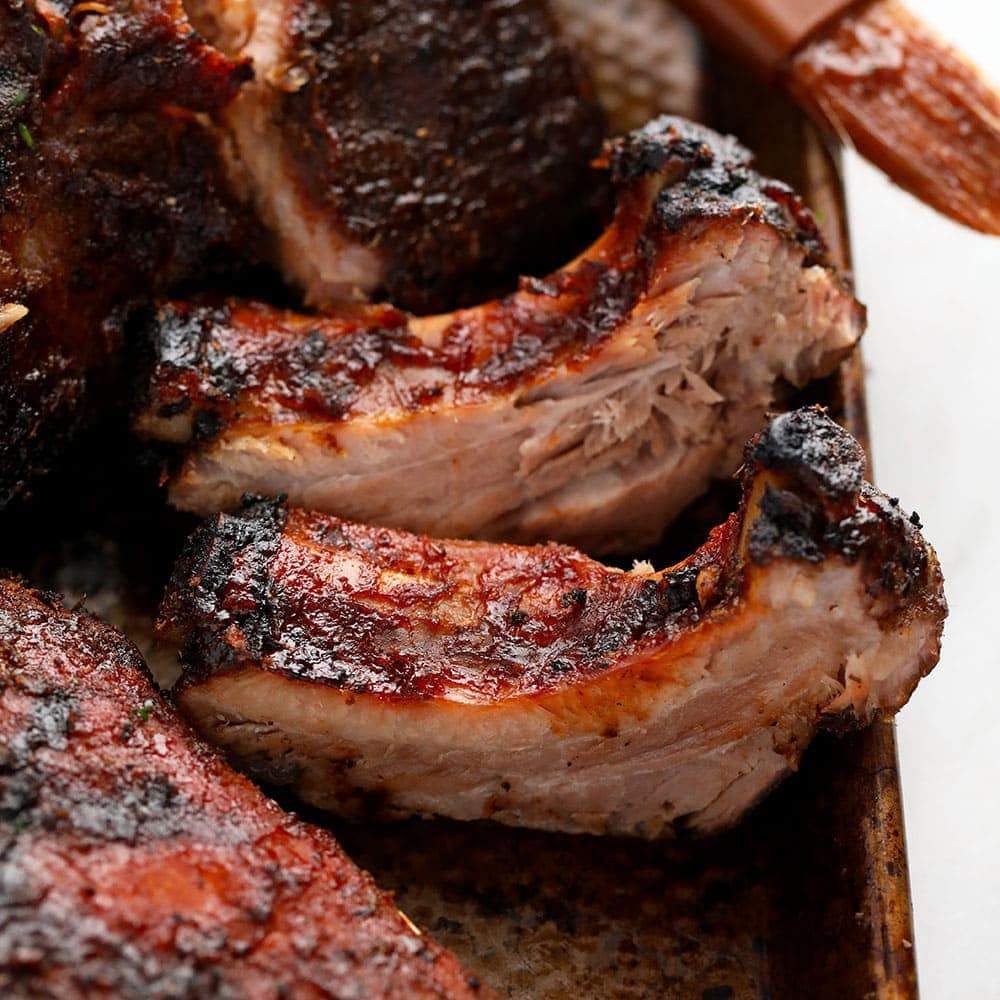
The Grand Finale: Achieving Irresistible Bark and Glaze
While sous vide handles the tenderness, the final step is where you develop that craveable crust, caramelized glaze, and smoky char that define great BBQ ribs. This is where mastering 24 hour sous vide ribs truly shines.
Post-Sous Vide Care
After their 24-hour bath, the ribs will look pale but will be incredibly tender. It's crucial to prepare them for the finishing stage:
- Cooling: If you're not finishing immediately, plunge the sealed bags into an ice bath to rapidly cool them down. Once cool, they can be refrigerated for several days. This allows for convenient meal planning.
- Drying: Before grilling or broiling, remove the ribs from the bag and pat them thoroughly dry with paper towels. A dry surface is essential for achieving a good sear, bark, and caramelization.
Grilling, Broiling, or Smoking Your Masterpiece
Now for the fun part – adding color, texture, and that signature BBQ finish:
- The Grill (Recommended): Preheat your grill to medium-high heat. Brush the ribs lightly with a little oil. Grill for 3-5 minutes per side, just long enough to develop some char and bark. Then, generously slather with your favorite BBQ sauce and, if desired, sprinkle with your reserved dry rub. Continue grilling, flipping and basting every few minutes, until the sauce is caramelized and slightly sticky, about 5-10 more minutes.
- The Oven Broiler: If a grill isn't available, preheat your oven broiler. Place the dried ribs on a baking sheet lined with foil. Broil for 3-5 minutes, watching carefully to prevent burning. Remove, slather with BBQ sauce, and broil again until the sauce is bubbly and caramelized, another 3-5 minutes.
- The Smoker: For an authentic smoky flavor, preheat your smoker to around 225-275°F (107-135°C). Smoke the ribs for 1-2 hours, applying BBQ sauce during the last 30 minutes, until a beautiful bark has formed and the sauce has set. This method infuses an incredible depth of flavor.
Regardless of your chosen finishing method, remember to keep a close eye on your ribs, as the high heat can quickly burn the sugar in the BBQ sauce. Once finished, let the ribs rest for 5-10 minutes before slicing and serving. This allows the juices to redistribute, ensuring maximum succulence.
Advanced Tips for Your Sous Vide Rib Journey
Elevate your 24 hour sous vide ribs even further with these insights:
- Flavor Variations: Don't limit yourself to just a dry rub. While sous vide, you can add liquid smoke, a splash of apple cider vinegar, or even a few sprigs of herbs like rosemary to the bag for additional aromatic notes.
- Batch Cooking & Meal Prep: One of the greatest advantages of sous vide is its suitability for batch cooking. Cook multiple racks of ribs simultaneously. After the water bath, chill them in an ice bath, then refrigerate. When you're ready to serve, simply re-heat and finish on the grill or broiler. This makes entertaining a breeze!
- Preventing Floating: If your bags float, which can happen if air is introduced or the ribs are buoyant, use ceramic plates, specific sous vide weights, or even binder clips to attach them to the side of the container with a chopstick resting across the top to keep them submerged.
Conclusion
Embarking on the journey of making 24 hour sous vide ribs is a culinary adventure that promises exceptional rewards. By embracing the precision of the sous vide technique, you unlock an unparalleled level of tenderness, moisture, and flavor that simply isn't achievable through conventional means. From the careful preparation and strategic application of your favorite dry rub to the precise 24-hour water bath and the exhilarating final finish, each step contributes to creating ribs that are not just fall-off-the-bone, but truly unforgettable. So set up your sous vide, prepare your ribs, and get ready to indulge in what many consider the ultimate BBQ experience.
