Mastering 24-Hour Sous Vide Ribs: Your Guide to Juicy BBQ Perfection
Imagine sinking your teeth into a rib so tender, the meat effortlessly detaches from the bone, practically melting in your mouth. This isn't just a dream – it's the delicious reality of
why 24-hour sous vide ribs are the best for fall-off-the-bone tenderness. While the world debates the ultimate method for preparing BBQ ribs – be it smoking, grilling, or baking – a growing chorus of culinary enthusiasts sings the praises of sous vide. Specifically, the 24-hour sous vide method has emerged as a game-changer, guaranteeing an unparalleled level of tenderness and juiciness that will make your rib night an unforgettable treat.
This comprehensive guide will walk you through the entire process, from preparing your rack of ribs to achieving that perfect smoky, caramelized finish. Get ready to discover why this "set it and forget it" technique is quickly becoming the secret weapon for backyard BBQ heroes and home chefs alike, consistently delivering ribs that earn rave reviews and disappear from plates in record time.
The Science of Tenderness: Why 24-Hour Sous Vide Ribs Reign Supreme
The magic behind ultra-tender
hour sous vide ribs: achieve ultimate fall-off-the-bone tenderness lies in the precise temperature control and extended cooking time that sous vide offers. Unlike traditional methods where temperatures can fluctuate and dry out the meat, a sous vide water bath maintains an exact temperature for the entire 24-hour duration. This prevents overcooking and creates the perfect environment for a remarkable transformation within the meat.
Here's how it works:
* **Collagen Breakdown**: Ribs, especially pork ribs, are rich in connective tissue, primarily collagen. At temperatures typically ranging between 145°F (63°C) and 165°F (74°C), a slow and steady process of collagen denaturing and converting into gelatin occurs. This gelatin is what gives the meat its incredibly succulent, melt-in-your-mouth texture. A 24-hour cook time ensures this breakdown is thorough, resulting in that coveted fall-off-the-bone tenderness without turning the meat mushy.
* **Moisture Retention**: Because the ribs are sealed in an airtight bag, all the natural moisture and flavorful juices are retained within the meat. There's no evaporation, no drying out, just pure, juicy goodness. This is a significant advantage over methods like baking or grilling alone, which can often lead to dry spots.
* **Perfect Doneness, Every Time**: With sous vide, it's virtually impossible to overcook or undercook your ribs. The water bath brings the meat to the exact internal temperature you desire and holds it there. This means consistency, predictability, and stress-free cooking, especially when preparing for a large group. You achieve a perfectly cooked "medium" doneness without the guesswork.
The combination of precise temperature, extended cooking, and moisture retention creates a rib experience that is simply unparalleled.
Preparing Your Ribs for Sous Vide Perfection
Before your ribs embark on their 24-hour journey to tenderness, a few crucial preparation steps are needed to ensure maximum flavor and optimal texture.
1. **Choose Your Ribs Wisely**: While this method works beautifully for various pork ribs, baby back ribs are a popular choice due to their leanness and quick cooking time. St. Louis-style ribs, cut from the spare rib, offer more meat and fat, resulting in an incredibly rich flavor. Ensure your ribs are fresh and of good quality.
2. **Remove the Membrane**: This is perhaps the most critical preparatory step. On the concave (bone) side of the rib rack, you'll find a thin, silvery-white membrane. While edible, it becomes tough and chewy when cooked, preventing seasonings from penetrating and making for a less pleasant eating experience.
* **How to Remove**: Use a small knife to gently loosen a corner of the membrane from one end of the rack. Once you have a good grip, use a paper towel for better traction and slowly peel it away. It should come off in one piece. Don't hesitate to ask your butcher to do this for you if you're uncomfortable!
3. **Crafting Your Dry Rub**: A flavorful dry rub is the foundation of delicious ribs. It infuses the meat with savory, sweet, and smoky notes that only deepen during the long sous vide cook.
* **Our Favorite Base**: A balanced rub typically includes salt, brown sugar (for caramelization and tenderness aid), paprika (smoked paprika for an extra kick), garlic powder, onion powder, black pepper, and a touch of cayenne or chili powder for heat.
* **Expert Tip**: We recommend creating a generous batch of your dry rub. You'll use it *twice* – once before sous vide and again right before the final finishing step to build layers of flavor. Set aside about ¼ cup of your rub for later.
* **Application**: Liberally apply the dry rub to both sides of the rib rack. Don't be shy! Massage it in with your hands, ensuring every crevice is coated. This initial rub not only flavors the meat but also aids in the tenderizing process due to the salt and sugar content.
The Sous Vide Process: Low and Slow to Perfection
With your ribs prepped and rubbed, it's time for the sous vide bath, where the magic truly unfolds.
1. **Seal the Ribs**: After applying the dry rub, your ribs need to be sealed in an airtight, food-safe bag.
* **Vacuum Sealer**: This is the preferred method for ensuring a tight seal and removing all air, which is crucial for even heat transfer in the water bath. If your rack is too long for one bag, you can cut it in half.
* **Water Displacement Method**: If you don't have a vacuum sealer, you can use a high-quality, freezer-safe zipper-top bag. Submerge the bag (with the ribs inside) almost entirely into a large pot of water, allowing the water pressure to push the air out. Carefully seal the bag just above the waterline.
* **Optional Addition**: Some home cooks like to add a splash of liquid to the bag (apple cider vinegar, beer, or even a little BBQ sauce) before sealing for extra moisture and flavor. Be mindful not to add too much, as it can dilute the rub.
2. **Set Up Your Water Bath**:
* **Equipment**: You'll need an immersion circulator (sous vide machine), a large pot or food-grade container, and enough water to fully submerge your ribs. A lid or plastic wrap to cover your container can help prevent water evaporation during the long cook.
* **Temperature**: For fall-off-the-bone ribs, a temperature of 145-155°F (63-68°C) is ideal. Lower temperatures (closer to 145°F) will yield very tender but still somewhat structured meat, while higher temperatures (closer to 155°F) will result in ribs that literally melt off the bone. Experiment to find your perfect preference.
* **Cook Time**: Place the sealed ribs into the preheated water bath. Set your immersion circulator for a full **24 hours**. Yes, you read that correctly! This extended cook time is key to achieving that superior tenderness.
3. **The Long Wait**: This is the easy part. Once the ribs are in the bath, you can leave them untouched. The beauty of sous vide is its precision – you don't need to monitor them constantly. Go about your day, knowing that your ribs are slowly transforming into culinary masterpieces.
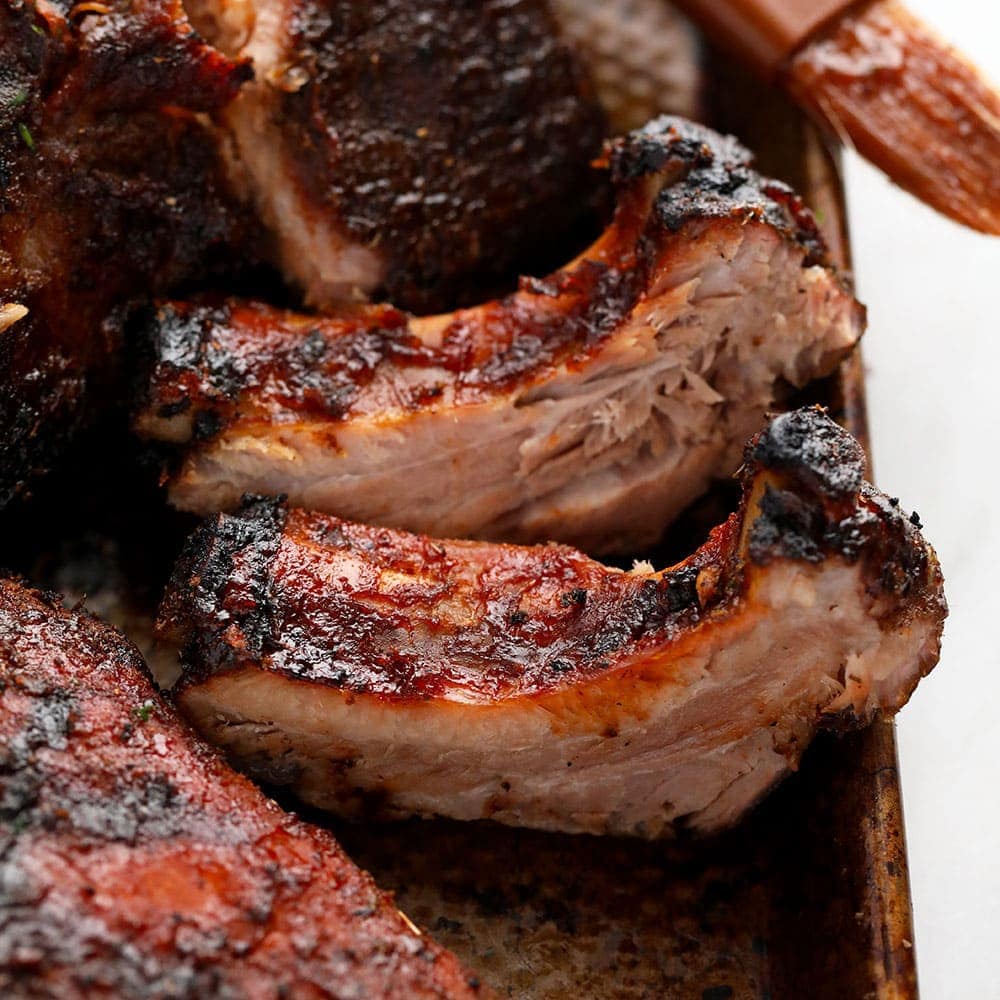
The Grand Finale: Achieving That Irresistible Bark and Glaze
After 24 hours in the water bath, your ribs will be incredibly tender but lack the smoky char and caramelized crust we associate with classic BBQ. This finishing step is crucial for flavor, texture, and visual appeal.
1. **Chill (Optional, but Recommended)**: For best results, especially if you're not finishing immediately, remove the bags from the water bath and plunge them into an ice bath for about 30-60 minutes to quickly cool them down. You can then refrigerate the ribs in their sealed bags for several days. This chilling step helps the meat firm up slightly, preventing it from falling apart during the finishing process.
2. **Dry and Re-Season**: Once cooled (or immediately after sous vide), carefully remove the ribs from their bags. Pat them *very* dry with paper towels. Excess moisture is the enemy of a good crust. Now, remember that ¼ cup of dry rub you saved? This is where it comes back into play! Give the ribs another light dusting with your reserved dry rub for an extra layer of flavor.
3. **Apply BBQ Sauce (Your Choice!)**: Brush your favorite BBQ sauce generously over both sides of the ribs. Whether it's a smoky, sweet, tangy, or spicy sauce, this is your chance to personalize your ribs.
4. **The Finishing Method**:
* **Grilling**: Preheat your grill to medium-high heat. Place the sauced ribs directly on the grates, turning occasionally. Grill for 5-10 minutes, or until the sauce is caramelized, slightly charred, and sticky. Be careful, as the sugars in the sauce can burn quickly.
* **Broiling**: If you don't have a grill, a broiler works well. Preheat your oven broiler on high. Place the ribs on a foil-lined baking sheet (for easy cleanup) and broil for 3-5 minutes per side, watching them constantly to prevent burning. The goal is a bubbly, caramelized glaze.
* **Oven Roasting**: For a slightly less intense finish, roast in a preheated oven at 400°F (200°C) for 10-15 minutes, or until the sauce has thickened and caramelized.
* **Smoking (Advanced)**: For the ultimate BBQ flavor, finish your sous vide ribs on a smoker at a higher temperature (e.g., 250-275°F / 120-135°C) for 1-2 hours, applying sauce in the last 30 minutes. The smoke will infuse a deeper, authentic BBQ aroma.
Once finished, let the ribs rest for a few minutes before slicing and serving. Watch them literally fall off the bone as you try to pick them up!
Conclusion: Your Path to Rib Nirvana
Mastering 24-hour sous vide ribs is a journey worth taking. This method removes the guesswork and stress from cooking ribs, consistently delivering results that will impress even the most discerning BBQ connoisseurs. From the precise temperature control that breaks down collagen into succulent gelatin to the final caramelized glaze, every step contributes to an unforgettable culinary experience. So, fire up your immersion circulator, prep those ribs, and prepare to indulge in the juiciest, most fall-off-the-bone tender ribs you've ever tasted. Your search for BBQ perfection ends here!